
T-HEAD 的Android 13建構
https://gitee.com/thead-android/thead-android/blob/master/README.md
https://www.youtube.com/watch?v=Na6PT4npsMg
The Lichee Pi 4A Wiki is here: https://wiki.sipeed.com/hardware/en/l…
And the VisionFive 2 Debian June 2023 Wiki is here: https://rvspace.org/en/project/Vision…
1. 取得Gitee內的倉庫:
将安卓开源项目(主线版本)和开发板支持源代码下载到工作目录,使用固定版本上游代码:
cyue test 2023-9-4: gitee 2023-7-7 版本可編譯成功。
mkdir riscv-android-src && cd riscv-android-src
repo init -u https://gitee.com/thead-android/local_manifests.git -b main_2023_7_7
git clone https://gitee.com/thead-android/local_manifests.git .repo/local_manifests -b thead-android-community
repo sync
使用最新版本上游代码,可能会由于兼容性导致一些编译问题:
cyue test: 確實使用AOSP無法編譯過。
# 標準 AOSP master repo
mkdir riscv-android-src && cd riscv-android-src
repo init -u https://android.googlesource.com/platform/manifest -b master
# 添加 THEAD source code repo
git clone https://gitee.com/thead-android/local_manifests.git .repo/local_manifests -b thead-android-community
repo sync -j 20
(大陸 git mirror)若无法连接google源可使用清华源镜像:
export REPO_URL='https://mirrors.tuna.tsinghua.edu.cn/git/git-repo/'2. 安裝到開發板
2.a 使用 BeagleV Ahead 開發板
完成下载后可以通过以下命令对系统进行构建
source build/envsetup.sh
lunch beaglev_ahead-userdebug
m -j
编译生成文件如下所示,可以将需要的文件拷贝供fastboot使用
$ ls out/target/product/beaglev_ahead/*img
out/target/product/beaglev_ahead/boot.img           out/target/product/beaglev_ahead/super_empty.img        out/target/product/beaglev_ahead/vendor_boot-debug.img
out/target/product/beaglev_ahead/cache.img          out/target/product/beaglev_ahead/system.img             out/target/product/beaglev_ahead/vendor_boot-test-harness.img
out/target/product/beaglev_ahead/dtb.img            out/target/product/beaglev_ahead/system_ext.img         out/target/product/beaglev_ahead/vendor_boot.img
out/target/product/beaglev_ahead/dtbo-unsigned.img  out/target/product/beaglev_ahead/userdata.img           out/target/product/beaglev_ahead/vendor_ramdisk-debug.img
out/target/product/beaglev_ahead/dtbo.img           out/target/product/beaglev_ahead/vbmeta.img             out/target/product/beaglev_ahead/vendor_ramdisk-test-harness.img
out/target/product/beaglev_ahead/product.img        out/target/product/beaglev_ahead/vbmeta_system.img      out/target/product/beaglev_ahead/vendor_ramdisk.img
out/target/product/beaglev_ahead/ramdisk.img        out/target/product/beaglev_ahead/vendor-bootconfig.img
out/target/product/beaglev_ahead/super.img          out/target/product/beaglev_ahead/vendor.img

$ mkdir fastboot
$ cd out/target/product/beaglev_ahead/
$ cp u-boot-with-spl.bin bootpart.ext4 boot.img super.img userdata.img vbmeta.img vbmeta_system.img vendor_boot.img ../../../../../fastboot/
2.b 使用 Lichee Pi 4A EVB 開發板
完成下载后可以通过以下命令对系统进行构建
source build/envsetup.sh
#若使用Lichee Pi 4A开发板
lunch lichee_pi_4a-userdebug
m -j
编译生成文件如下所示,可以将需要的文件拷贝供fastboot使用
$ ls out/target/product/lichee_pi_4a/*img
out/target/product/lichee_pi_4a/boot.img           out/target/product/lichee_pi_4a/super_empty.img        out/target/product/lichee_pi_4a/vendor_boot-debug.img
out/target/product/lichee_pi_4a/cache.img          out/target/product/lichee_pi_4a/system.img             out/target/product/lichee_pi_4a/vendor_boot-test-harness.img
out/target/product/lichee_pi_4a/dtb.img            out/target/product/lichee_pi_4a/system_ext.img         out/target/product/lichee_pi_4a/vendor_boot.img
out/target/product/lichee_pi_4a/dtbo-unsigned.img  out/target/product/lichee_pi_4a/userdata.img           out/target/product/lichee_pi_4a/vendor_ramdisk-debug.img
out/target/product/lichee_pi_4a/dtbo.img           out/target/product/lichee_pi_4a/vbmeta.img             out/target/product/lichee_pi_4a/vendor_ramdisk-test-harness.img
out/target/product/lichee_pi_4a/product.img        out/target/product/lichee_pi_4a/vbmeta_system.img      out/target/product/lichee_pi_4a/vendor_ramdisk.img
out/target/product/lichee_pi_4a/ramdisk.img        out/target/product/lichee_pi_4a/vendor-bootconfig.img
out/target/product/lichee_pi_4a/super.img          out/target/product/lichee_pi_4a/vendor.img

$ mkdir fastboot
$ cd out/target/product/lichee_pi_4a/
$ mkdir fastboot
$ cp bootpart.ext4 boot.img super.img userdata.img vbmeta.img vbmeta_system.img vendor_boot.img ../../../../../fastboot/
图5. Lichee Pi 4A EVB 连接
开发板使用主要需要连接电源、串口、usb和显示:
- 串口主要用于U-boot和内核中的命令交互,可通过底板上 GPIO 的 U0-RX 和 U0-TX连接,波特率为115200
- USB Device接口主要用于fastboot和adb工具的连接
- MIPI DSI/HDMI接口可以使用于连接屏幕显示UI界面
对系统进行完整烧写需要按住开发板的boot按键同时按复位键进入boot烧写模式。
之后使用fastboot对系统镜像进行烧写,adb和fastboot工具可以访问安卓开发者网站下载 https://developer.android.com/tools/releases/platform-tools
#烧录uboot并初始化boot环境变量
fastboot flash ram u-boot-with-spl.bin
fastboot reboot
fastboot flash uboot u-boot-with-spl.bin

#烧录各个分区
#在非boot烧写模式,可以在uboot的命令行中输入命令fastboot usb 0,单独烧录分区
fastboot flash bootpart bootpart.ext4
fastboot flash boot boot.img
fastboot flash vendor_boot vendor_boot.img
fastboot flash super super.img
fastboot flash userdata userdata.img
fastboot flash vbmeta vbmeta.img
fastboot flash vbmeta_system vbmeta_system.img

#初始化metadata和misc分区
fastboot erase metadata
fastboot erase misc
当完成烧写后重新复位上电进入系统启动模式,可以通过串口/ADB访问系统的命令行,并可通过触屏或外接HDMI显示系统图像界面进行交互。

图6.在Lichee Pi 4A上运行AOSP主线
(如需更多优化及稳定调优的系统支持可联系我们获取==安卓12版本==支持,该版本具有较为完整的系统组件和外设HAL支持,适配了GPU、VPU、Camera、Audio、NPU等外围硬件,并进行了较为完善的XTS测试和压力测试。 可通过==关于我们==小节中的==工单系统==获取相关支持)
3. 提供貢獻
本项目使用Pull Requests接收外部贡献,可参考以下流程:
- 在个人账户中Fork需要修改的代码仓库。
- 创建一个对应于改动的开发分支。
- 用个人账户下的代码仓库替换原始仓库来源和修订版本:
- <project path="device/thead/common" name="device-thead-common" revision="alpha_0_2_0" remote="thead" />
+ <project path="device/thead/common" name="device-thead-common" revision="alpha_0_2_0_xxx_support" remote="your_personal_remote" />- 所有新工作都应基于相应的开发分支。
- 创建提交时需要尽量保证改动的独立和完整,并填写适当的提交消息。
- 创建改动时最好包含相关单元测试结果。
- 将开发分支推送到你在 Gitee 上的个人存储库 Fork。
- 创建一个针对相应开发分支的Gitee Pull Request,若该提交为bug修复请将该提交关联至问题跟踪器中的问题。
4. 相关链接
本项目问题跟踪器(生态板支持安卓相关问题请提交至该跟踪器):
https://gitee.com/thead-android/thead-android/issues
平头哥其他开源软件项目可以通过以下链接进行访问:
T-HEAD Yocto Linux: https://gitee.com/thead-yocto
YoC Open: https://gitee.com/yocop
若希望了解更多TH1520原形及无剑600平台信息可以访问:
https://xuantie.t-head.cn/product/wujian/4080405462988689408
若希望了解更多RISC-V架构安卓支持的动态,可以订阅RISC-V Android SIG邮件列表,参与社区讨论:
https://lists.riscv.org/g/sig-android
若对RISC-V架构的安卓支持有任何疑问,可以提交问题至Android-riscv64的通用问题跟踪:
https://github.com/google/android-riscv64/issues
5. 许可证
我们不需要任何正式的版权转让或贡献者许可协议。任何有意向本仓库提交的贡献都被认为是按照Apache许可证2.0条款提供的。有关详细信息请参见LICENSE文件。
6. 关于我们
该仓库由阿里巴巴平头哥维护。
若需要技术支持可以通过OCC提交工单: https://occ.t-head.cn/people/workorder-submit
也可以通过以下方式联系我们: 邮箱: occ_thead@service.alibaba.com
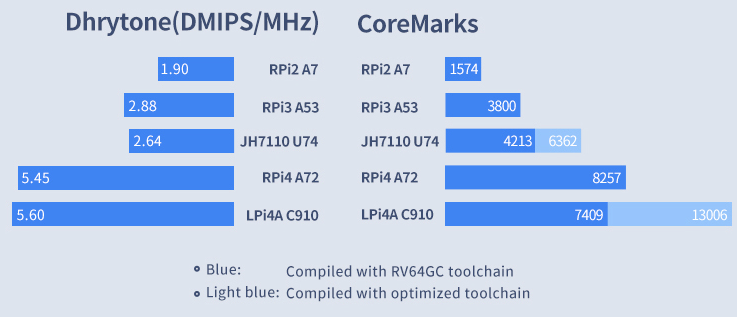
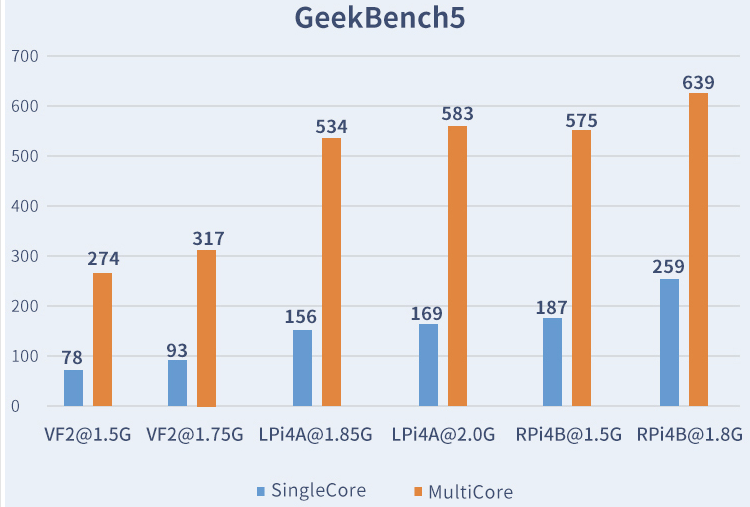
Lichee Pi 4A 性能參考比較
- 與樹梅派4 和 StartFive VisionFive 2 平台比較
https://www.youtube.com/watch?v=Na6PT4npsMg
https://wiki.sipeed.com/hardware/en/lichee/th1520/lpi4a/1_intro.html
1. GIMP
2. Dhrytone
3. GeekBench5
AOSP build on ASUS Laptop
0. Ubuntu on ASUS Laptop Problems
The very first problem is that the screem turned into black while install Ubuntu. It’s the Nvidia driver (open sourced) issue.
follow the link:
https://www.youtube.com/watch?v=zdE_4Kar_GU
to resolve it.
My workable driver is "nvidia-driver-535", not the one with "(open kernel)" label….
The 2nd Problem is no audio.
-
Install the alsa-tools to get the tool first:
sudo apt install alsa-tools -
then, add 4 hda-verb command lines into /etc/rc.local.
sudo pico /etc/rc.localSince I have no rc.local before, my rc.local looks like:
#!/bin/sh /usr/bin/hda-verb /dev/snd/hwC1D0 0x20 0x500 0xf /usr/bin/hda-verb /dev/snd/hwC1D0 0x20 0x400 0x7774 /usr/bin/hda-verb /dev/snd/hwC1D0 0x20 0x500 0x45 /usr/bin/hda-verb /dev/snd/hwC1D0 0x20 0x400 0x5289hwC1D0is the sound card which controlled my notebook speaker. ThehwC0D0some guys had suggest is on my HDMI port.Then turn on the sound card speaker through insert 4
hda-verbcalls in/etc/rc.local, these command will turn on the audio before user login: -
Install Nvidia GPU may have several ways, command line is what I prefered:
# 1. list nvidia drivers
ubuntu-drivers devices
# 2. install the non open driver with max. version number, for ex., 535:
sudo apt install nvidia-driver-535
## This driver is good for me
ref: https://linuxconfig.org/how-to-install-the-nvidia-drivers-on-ubuntu-20-04-focal-fossa-linux
Remember to reboot system after the audio & video driver had been updated…
1. Envelopment Setup & Tools
1.1 ~/.bin path for repo and python
mkdir -p ~/.bin
wget https://storage.googleapis.com/git-repo-downloads/repo > ~/.bin/repo
chmod a+rx ~/.bin/repo

ln -s /usr/bin/python3 ~/.bin python

echo "
########################## AOSP OUTPUT PATH
PATH=\${HOME}/.bin:\${PATH}
# seperate path may cause unstable build, remark it...
# export OUT_DIR=~/aosp_out
# export OUT_DIR_COMMON_BASE=xxx
" >> ~/.bashrc
then reopen terminal.
1.2 get tools
# get tools
sudo apt install git-core gnupg flex bison build-essential zip curl zlib1g-dev libc6-dev-i386 libncurses5 lib32ncurses5-dev x11proto-core-dev libx11-dev lib32z1-dev libgl1-mesa-dev libxml2-utils xsltproc unzip fontconfig

# usb control:
sudo usermod -aG plugdev $LOGNAME
sudo apt install android-sdk-platform-tools-common
1.3 set git name & email for android.googlesource.com
git config --global user.email "cyue12@google.com"
git config --global user.name "cyue12"
1.4 Gen. android.googlesource.com keys
- browse & login your google account :
https://android.googlesource.com/new-password- get and execute your password script:
eval 'set +o history' 2>/dev/null || setopt HIST_IGNORE_SPACE 2>/dev/null
 touch ~/.gitcookies
 chmod 0600 ~/.gitcookies

 git config --global http.cookiefile ~/.gitcookies

 tr , \\t <<\__END__ >>~/.gitcookies
android.googlesource.com,FALSE,/,TRUE,2147483647,o,git-cyue12.gmail.com=1//0g_qocQb1SED6CgYIARAAGBASNwF-L9IrNF3Ig-VWzWAvMP_Ve8jstFG-B2VhmNf6QeotHF9uaw86IxkITTqsAe0L2v_wQtLxApo
android-review.googlesource.com,FALSE,/,TRUE,2147483647,o,git-cyue12.gmail.com=1//0g_qocQb1SED6CgYIARAAGBASNwF-L9IrNF3Ig-VWzWAvMP_Ve8jstFG-B2VhmNf6QeotHF9uaw86IxkITTqsAe0L2v_wQtLxApo
__END__
eval 'set -o history' 2>/dev/null || unsetopt HIST_IGNORE_SPACE 2>/dev/null
1.5 GPG keys
驗證 Git 標籤
將以下公鑰加載到您的 GnuPG 密鑰數據庫中。該密鑰用於簽署代表發布的帶註釋的標籤。
gpg --import複製並粘貼下面的密鑰,然後鍵入EOF ( Ctrl-D ) 結束輸入並處理密鑰。
-----BEGIN PGP PUBLIC KEY BLOCK-----
Version: GnuPG v1.4.2.2 (GNU/Linux)

mQGiBEnnWD4RBACt9/h4v9xnnGDou13y3dvOx6/t43LPPIxeJ8eX9WB+8LLuROSV
lFhpHawsVAcFlmi7f7jdSRF+OvtZL9ShPKdLfwBJMNkU66/TZmPewS4m782ndtw7
8tR1cXb197Ob8kOfQB3A9yk2XZ4ei4ZC3i6wVdqHLRxABdncwu5hOF9KXwCgkxMD
u4PVgChaAJzTYJ1EG+UYBIUEAJmfearb0qRAN7dEoff0FeXsEaUA6U90sEoVks0Z
wNj96SA8BL+a1OoEUUfpMhiHyLuQSftxisJxTh+2QclzDviDyaTrkANjdYY7p2cq
/HMdOY7LJlHaqtXmZxXjjtw5Uc2QG8UY8aziU3IE9nTjSwCXeJnuyvoizl9/I1S5
jU5SA/9WwIps4SC84ielIXiGWEqq6i6/sk4I9q1YemZF2XVVKnmI1F4iCMtNKsR4
MGSa1gA8s4iQbsKNWPgp7M3a51JCVCu6l/8zTpA+uUGapw4tWCp4o0dpIvDPBEa9
b/aF/ygcR8mh5hgUfpF9IpXdknOsbKCvM9lSSfRciETykZc4wrRCVGhlIEFuZHJv
aWQgT3BlbiBTb3VyY2UgUHJvamVjdCA8aW5pdGlhbC1jb250cmlidXRpb25AYW5k
cm9pZC5jb20+iGAEExECACAFAknnWD4CGwMGCwkIBwMCBBUCCAMEFgIDAQIeAQIX
gAAKCRDorT+BmrEOeNr+AJ42Xy6tEW7r3KzrJxnRX8mij9z8tgCdFfQYiHpYngkI
2t09Ed+9Bm4gmEO5Ag0ESedYRBAIAKVW1JcMBWvV/0Bo9WiByJ9WJ5swMN36/vAl
QN4mWRhfzDOk/Rosdb0csAO/l8Kz0gKQPOfObtyYjvI8JMC3rmi+LIvSUT9806Up
hisyEmmHv6U8gUb/xHLIanXGxwhYzjgeuAXVCsv+EvoPIHbY4L/KvP5x+oCJIDbk
C2b1TvVk9PryzmE4BPIQL/NtgR1oLWm/uWR9zRUFtBnE411aMAN3qnAHBBMZzKMX
LWBGWE0znfRrnczI5p49i2YZJAjyX1P2WzmScK49CV82dzLo71MnrF6fj+Udtb5+
OgTg7Cow+8PRaTkJEW5Y2JIZpnRUq0CYxAmHYX79EMKHDSThf/8AAwUIAJPWsB/M
pK+KMs/s3r6nJrnYLTfdZhtmQXimpoDMJg1zxmL8UfNUKiQZ6esoAWtDgpqt7Y7s
KZ8laHRARonte394hidZzM5nb6hQvpPjt2OlPRsyqVxw4c/KsjADtAuKW9/d8phb
N8bTyOJo856qg4oOEzKG9eeF7oaZTYBy33BTL0408sEBxiMior6b8LrZrAhkqDjA
vUXRwm/fFKgpsOysxC6xi553CxBUCH2omNV6Ka1LNMwzSp9ILz8jEGqmUtkBszwo
G1S8fXgE0Lq3cdDM/GJ4QXP/p6LiwNF99faDMTV3+2SAOGvytOX6KjKVzKOSsfJQ
hN0DlsIw8hqJc0WISQQYEQIACQUCSedYRAIbDAAKCRDorT+BmrEOeCUOAJ9qmR0l
EXzeoxcdoafxqf6gZlJZlACgkWF7wi2YLW3Oa+jv2QSTlrx4KLM=
=Wi5D
-----END PGP PUBLIC KEY BLOCK-----
導入密鑰後,您可以使用以下方法驗證任何標籤:
git tag -v TAG_NAME2. Get AOSP repo
make aosp path:
mkdir aosp
cd aosp
repo init with a path for your account, then sync paralleling
repo init -u https://android.googlesource.com/a/platform/manifest
repo init -u https://android.googlesource.com/a/platform/manifest -c -b master
repo sync -c -j20
hint: normal repo without account
repo init -u https://android.googlesource.com/platform/manifest -b master
repo sync -c -j20
Test:
- Office PC: i5-8500 6core 64GB RAM, 1000M ethernet, with -j12:
fetch 1259 jobs, 01:56:49 time.
55:46 checkout time
172507 MB total size- 624 make module, 161112 jobs, exec.
m -jfrom 14:02 to…16:50 fail, & retry- 12700H ASUS: with -j20 wifi fetching:….
old tar:
repo sync -j20
remote: Finding sources: 100% (6/6)
remote: Total 6 (delta 2), reused 6 (delta 2)
展開物件中: 100% (6/6), 82.94 KiB | 2.51 MiB/s, 完成.
Fetching: 98% (1244/1260) 2:03 | 4 jobs | 2:02 platform/prebuilts/runtime @ prebuilts/runtime

Fetching: 100% (1260/1260), done in 3m35.043s
prebuilts/r8/: discarding 1 commits
device/google/cuttlefish_prebuilts/: discarding 1 commits
prebuilts/runtime/: discarding 1 commits
Checking out: 100% (1259/1259), done in 12.825s
repo sync has finished successfully.
3. lunch & build
# built setting
. build/envsetup.sh
# select arch
lunch 10
### index 10 for riscv64, cuttlefish phone platform
# clear previous binaries to make build better
m clean

# build with 'm' for hyperspeed... but may hit resource hazzard
m
# hazzard happened, try with my cpu core count (6+8=14), (time take ~ 1:20)
m -j14 all
# build successfully on my 32GB 12700H, (time take ~ 1:39) Hooray!!
...
[ 99% 623/624] finishing legacy Make module parsing ...
...
[ 0% 817/161107] //external/guava:guava-android-annotation-stubs javac [linux_glibc common] (priority: 153)
...
^c xxx
...
[ 99% 2225/2226] finishing legacy Make module parsing ...
...
[ 1% 2299/161439] //external/turbine:turbine javac [linux_glibc common]
4. Android Kernel( GKI2?)
cd ~
mkdir android-kernel && cd android-kernel
repo init -u https://android.googlesource.com/kernel/manifest
repo sync
5. Emulator (Try)
sudo apt install qemu-system-riscv64For non-graphical interface:
emulator -no-qt -show-kernel -noaudio -selinux permissive -qemu -smp 1 -m 3584M -bios kernel/prebuilts/5.10/riscv64/fw_jump.binFor graphical interface:
emulator -verbose -no-boot-anim -show-kernel -noaudio -selinux permissive -qemu -smp 4 -m 8192M -bios kernel/prebuilts/5.10/riscv64/fw_jump.binNotice: Ubuntu 18.04 and 20.04 should work, but 22.04 may crash.
mkdir prebuilts/ndk/current/sources/cxx-stl/llvm-libc++/libs/riscv64 -p

# link libc++
cd /aosp/prebuilts/ndk/current/sources/cxx-stl/llvm-libc++/libs/riscv64
ln -s ../../../../../../../clang/host/linux-x86/clang-r498229/android_libc++/ndk/riscv64/lib/libc++_shared.so libc++_shared.so
ln -s ../../../../../../../clang/host/linux-x86/clang-r498229/android_libc++/ndk/riscv64/lib/libc++_static.a libc++_static.a

m target
留言